Innovate everywhere with intelligent business applications
When we think of Microsoft Business Applications, there is a diverse array of software applications that integrate with each other in perfect harmony. This enables solution architects to organize a perfect solution using the Microsoft platform. As consultants, power users, and decision-makers we should be aware of these technologies and how they can be used to increase productivity in their projects or organizations.
This blog is divided into two parts dedicated to sharing knowledge of D365 Finance and Operations Business events’ introduction to implementation.
In this part, we are discussing business event introduction, categories, and their uses.
Introduction:
Business events provide a mechanism that lets external systems receive notifications from Finance and Operations applications. In this way, the systems can perform business actions in response to the business events.
Business events occur when a business process is executed. During a business process, users who participate in it perform business actions to complete the tasks that make up the business process.
A business action that a user performs can be either a workflow action or a non-workflow action. Approval of a purchase requisition is an example of a workflow action, whereas confirmation of a purchase order is an example of a non-workflow action. Both types of actions can generate business events that external systems can use in integration and notification scenarios.
The main objective of this framework is to send out notifications outside dynamics to tell the external systems that something is happening in dynamics. Now as the name suggests a business event is an event that has a business meaning attached to it.
Example:
Consider a scenario where a sales quotation has been confirmed and it became a sales order. In this situation, you might notice your sales team. That is where you might need to integrate with third-party applications. Instead of writing code or customizing D365 F&O to call those APIs, we can use a business event framework to send out this notification outside D365 F&O, and listeners who are listening to this notification can take some actions which they want to take.
This is the form that displays all the business events in Microsoft Dynamics 365 F&O. List of business events available out of the box, Microsoft added more events with new releases. On the left side are the fields that get sent out in the notification of this business event.

Business event has categories. There are three major categories.
- Alerts
- Business Events
- Workflow
Alerts:
Alerts can be captured as business events and this becomes a very powerful and generic platform because alerts can be configured throughout the application in various forms.
For Example:
Alerts can be captured as due date alerts for example customer invoice is due in three days and you have set up a due date alert. You can actually send out notifications from outside dynamics and the listener can send the SMS to your customer. You do not need to customize such scenarios.
Business Event:
This category is all about the business category for example account receivable, accounts payable, and purchase orders. All these modules have their business events.
Work Flow:
Workflow is a framework within D365 F&O for approval mechanisms and you can send out the workflow notifications from outside the application.
Uses and benefits
Procurement
When you use procurement business events it easy the communication process between the office team and the production team when the production order is created and the floor team will notify by a third-party application so they can speed up the process of production.
Customer master
When a customer is created you can enter the credit limit/due date in the customer master. When an invoice is due then a business event will trigger and notify you on your mobile SMS.
Sales Order
This allows businesses with third-party warehouses application to send the picking information to the system. This can also be used if the warehouse has automated picking machines that determine what is required. This approach puts the responsibility of prioritizing picking and utilization on the external system and simplifies the setup in the application.
How to configure Endpoints
Endpoints are the listeners to these business events. You can configure your endpoints. When you go to configure the endpoint, you will see the list of supported endpoint types. These are the standard available endpoints that can listen to the business events also you can add custom endpoints as well. When a business event occurs and there is an active endpoint the payload gets sent out. In case the endpoints are down it will be captured in the error log.

Create a Business Event Endpoint
Let’s start and set up an “Endpoint” which is where our business event setup will be sent to.
- Step 1
Open the endpoint tab and click new
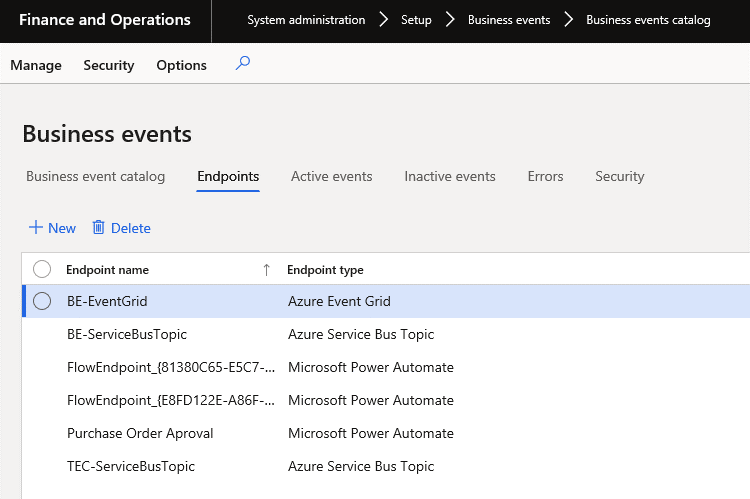
Specify the endpoint type. There are many different types of endpoints that the system supports, including sending the messages to AZURE, Microsoft power automate, and a custom https endpoint

For now, I am setting up an HTTPs endpoint. Select HTTPs from the list and then click Next.
Configure Business Event Endpoint
You will fill in the 5 pieces of information on the next form. We will go through each one and how to find their values in the Azure portal.
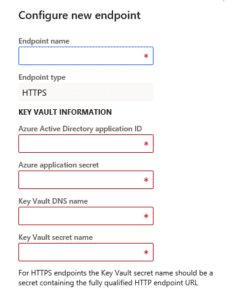
- Endpoint name
This is the name of the endpoint, and you can specify whatever you want.
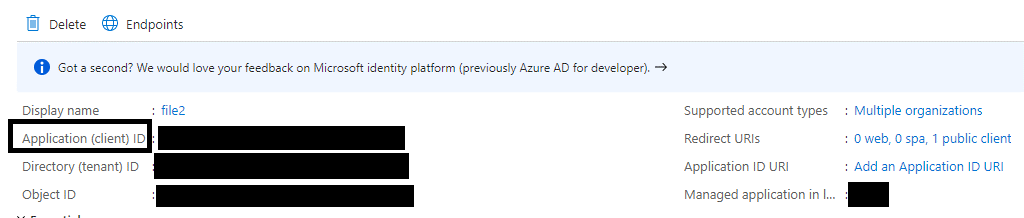
- Azure Active Directory application ID
Access portal.azure.com and sign in. Go to azure active directory, then registrations.
In the list, select the app that is used by your D365 instance. When the application is open you will see the value next to the application id. It is this value that you need to use in this field.
- Azure application secret
This field should be populated with the ‘client secret ID‘ of your Azure active directory application found in the previous step. You need to use the value you wrote down when the Azure app registration record was created
- Key Vault DNS name
- From the Azure portal menu, or from the home page, select Create a resource.
- In the Search box, enter Key Vault.
- From the results list, choose Key Vault.
- On the Key Vault section, choose to Create.
- In the Create key vault section provide the following information:
- Name: A unique name is required.
- Subscription: Choose a subscription.
- Under Resource Group, choose to Create new and enter a resource group name.
- In the Location pull-down menu, choose a location.
- Leave the other options to their defaults.
- After providing the information above, select Create.
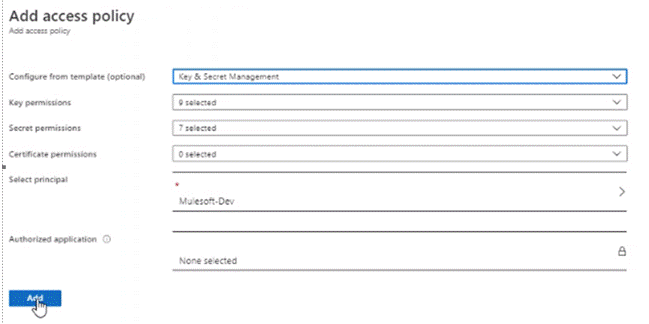
- Go to the access policy and provide the desired permissions.
- Set the Connectivity method on the ‘Networking’ tab.
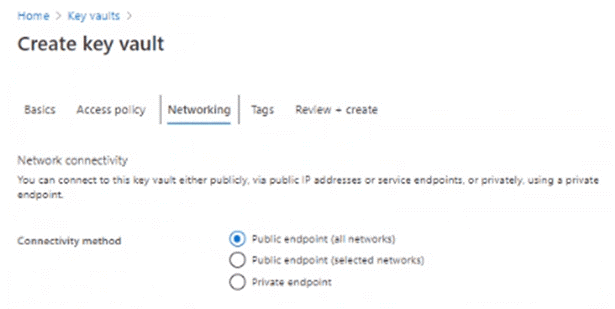
- Review settings and click Create.
- Lastly, click on the ‘Overview’ tab of your key value, and copy the value in the ‘DNS Name’ field. This is the value you will enter into the ‘Key Vault DNS Name’ field when setting up the business event endpoint.
- Key Vault secret name
If you have not already created a key-value secret, perform the following steps:
Add a Secret to the Azure Key Vault
- From the Key Vault click on the Secrets tile.
- Under Secrets, select Add.
- Under Create a secret, from the list of Upload options, choose an option with which you want to create a secret. Select Manual.
- Enter a Name for the secret. The secret name can contain only alphanumeric characters and the hyphen (-) character. This is the value that you will need to use in the ‘Key vault secret name’ field when setting up the business event endpoint.
- Enter the https URL that you would like the business event message to be sent to, in the Value field of the secret.
- Select Create to start the deployment.
Go back inside the D365 form, and fill out the ‘Configure new Endpoint’ form with the values you have discovered. Then click ‘Ok’ to create the endpoint.
You will now see your endpoint listed on the endpoints tab.

Implement the Business Event
As we previously configured the endpoint for D365. Now you will activate the D365 business event and then connect to the endpoint setup. This will cause business event messages to be sent to the endpoints.
Go to
System Administration > Setup > Business events > Business events catalog
Select the business event you want to activate. I have selected the business event Id “SalesInvoicePostedBusinessEvent”.
This will trigger whenever a sales order is invoiced.
Next, select the Activate link’:

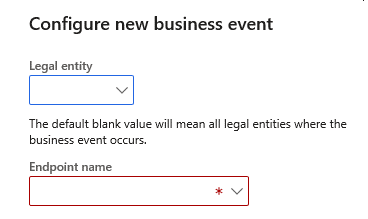
A dialogue box will show up. Enter in the legal entity and endpoint that you want the business event to be sent to. Then specify the endpoint name and click Ok.
Select the Active events tab and verify that the business event is indeed activated.
Setup Business Events Batch Job
There are still a few more steps that must be taken in order for the business events to work at all. By default, they are not enabled in the D365 system.
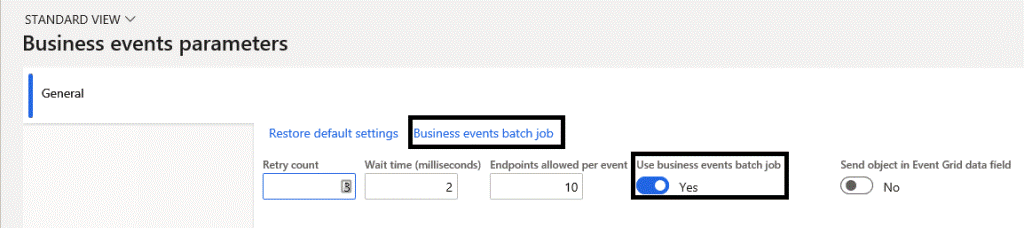
Go to the ‘Business events parameters’ form in D365
Check the ‘Use business events batch job’ radio button. The link ‘Business events batch job’ will become visible. Select the link to open the batch job dialog form. Fill the dialog and make sure to set up the batch job to run with a re-occurrence. This job will be responsible for processing the business event messages and sending them out once they are created. So, for testing purposes, set the re-occurrence to something like 1 minute.
Enable D365 Business Events at the System Level
There is still one more thing needed to enable business events.
Open SQL server management studio and connect to the ‘AxDB’ database.
Then run the following SQL statement:
Update Business Events Parameters set Enabled = 1
Microsoft has a second ‘Enabled’ flag that is not visible on the Business events parameters form, that can only be set through a SQL statement.
Validate the Events are being processed
Now test out the business event functionality. Run the functional process that triggers the business event. In my case, I activated the business event that will trigger when a sales order is invoiced. So, we will create an invoice a sales order.
Verify that your business event by checking the table BUSINESSEVENTSCOMMITLOG.
If you check the BUSINESSEVENTSCOMMITLOG table right after you invoice the sales order, you will see a message staged in this table.
Next, depending on the reoccurrence setup, the business events batch job will run and process the records in this table.
If your business event is processed successfully, it will be removed from the BusinessEventsCommitLog table and sent to your endpoint. If there is an error, the record will still be removed from the BusinessEventsCommitLog table and a new record is created in the BusinessEventsExceptionLog table.
To check the exception, go to the Business Events catalog form in D365, and then click on the Errors tab. There is an exception message that will tell you what error occurred.