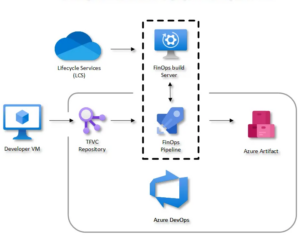
Azure DevOps Pipelines is a cloud service that you can use to automatically build, test and deploy your code to (m)any environments. Since Apr 2019 you can use new Azure DevOps tasks for Microsoft Dynamics 365 to upload and deploy your application deployable package to LCS environments. This blog describes how to create build and development server and set up Azure DevOps to build and deploy code for Microsoft Dynamics 365 to LCS environment.
1-Pre-Requisite:
- Before implementing this blog you must have to go through my previous blog How To Setup A Connection Between Azure DevOps & LCS. to successfully create build & development server.
2-Setup Agent Pool:
If you are an organization administrator, you create and manage agent pools from the agent pools tab in admin settings.
- Sign in to your organization (https://dev.azure.com/{yourorganization}).
- Choose Azure DevOps, Organization settings.
- Click on “New agent pool…” button and give it a name.

3-Build Agent Setup
As part of the LCS deployment to a Microsoft-hosted environment, you can configure a Build Agent properties. As a part of the deployment process, you can configure your build agent name and the name of the agent pool that will be this agent owner. The agent pool must exist prior to deployment or the deployment will fail. By default, the “Default” agent pool is used, but here we are using our own agent pool.
- In your LCS environment, go to your Project and select cloud hosted environment setting from the top.
- Here you can select the Add button and after selecting the proper version choose the Dev/Test Environement Topology.
- After that choose the Build/Test environment and in advance setting choose the pool which you were created in past.

- When a Build VM is deployed in Developer topology through LCS, it is pre-configured and ready to start a build. You can change the default configuration at any time from the Visual Studio IDE or the Azure DevOps interface.

3.1-Setup Build Pipeline
- In your Azure DevOps Project Pipeline Section, Select your pipeline and click “Edit”. Default build pipeline will consist of many steps. I will just walk through the most important. As a first step, you give your pipeline a proper name and select the agent pool you created in the previous step.

- Then, you can map source code folders you want to include in the build and cloak the ones you want to exclude. Optionally select Clean options and whether you want to apply Label in your selected Azure repository branch. To distinguish between Labels, you can leverage various built-in variables or create your own. I will talk about variables later.

- These were the basic steps and now you can test your build pipeline. If needed, you can adjust build parameters and finally queue a new build.
- As a result of a successful build, build artifacts are published in your pipeline. Build artifacts are the files produced by your build, e.g. application deployable package. You can download artifacts produced by your build from an instance of the successfully completed build.

4-Developer Agent Setup
To deploy a cloud development environment in your Lifecycle Services (LCS) project:
- Create a connection between an LCS project and your Azure subscription. You’ll need your Azure subscription ID and authorize the use of the subscription.
- Select + under Environments to deploy.
- Select an application and platform version.
- Select an environment topology.
- If you chose a cloud-hosted environment, select which Azure connector you want to use.Then Select Develop Topology.
- Then on next page, simply click the done and your dev machine is deployed, it usually takes 5 to 6 hours approximately for the machine to be in deployed state.
- The user who requests the cloud environment is provisioned as the administrator in that environment.
- User accounts are provisioned on the development VM to allow access to the environment using Remote Desktop, these credentials are accessible on the environment page in LCS.

4.1-Visual Studio Solution and Project Setup
- Login to Azure DevOps then go to your Project > Repos.
- Click the 3 dots next to the Trunk folder to create 2 folders called ‘Dev’ and ‘Main’.
- Create 2 sub-folders called ‘Metadata’ and ‘Projects’ under each of the Dev and Main folders. Your folder structure should look like this:

- Login to your Dev environment.
- Launch File Explorer to create the following folder structure in your C drive.
- Launch Visual Studio in Admin mode.
- Create a new project.

- Type ‘Finance Operations’ in the search field then select Finance Operations and click next.
- Enter your project name, location, and solution name then set your location to “C:\VS\Projects\” folder. Leave the box ‘Place solution and project in the same directory’ unchecked and click create.

- From the main menu, click View > Team Explorer.
- Click the Home icon then Source Control Explorer.
- Click the plug icon at the top to connect your local environment with Azure DevOps Project.
- From the Source Control Explorer, open Workspaces.
- Click ‘add’ to create a workspace:<ComputerName>_Dev.
- Select the Dev workspace then click edit. Map your Source Control Folders to your Local Folders as follows. Click ok when done.

- Switch to your Dev workspace.
- Convert the Dev and Main Folders to Dev and Main Branches:Right click Dev > Branching and Merging > Convert to Branch.Right click Main > Branching and Merging > Convert to Branch.

- In this way, developers work in the Dev branch and when they successfully done their work we simply merge the code from Dev > Main Branch and apply the changes.
- Right-click the Main folder then select ‘Check In Pending Changes’. This will copy the files to the Main folder in DevOps Repos (Main Source Control).
5-Conclusion
- Now you simply have to commit the changes by going to the pending changes section in source control explorer and your code is successfully synced to the Azure DevOps Repo and triggered the build pipeline, In this way you can successfully create build and development server and connect Azure DevOps to automate your package deployment!
Thank you for your time to read this. In part 2, I will discuss how to deploy a build artifact to selected LCS environment.